- Get link
- X
- Other Apps
- Get link
- X
- Other Apps
 |
| Barbie photobooth template using photoshop |
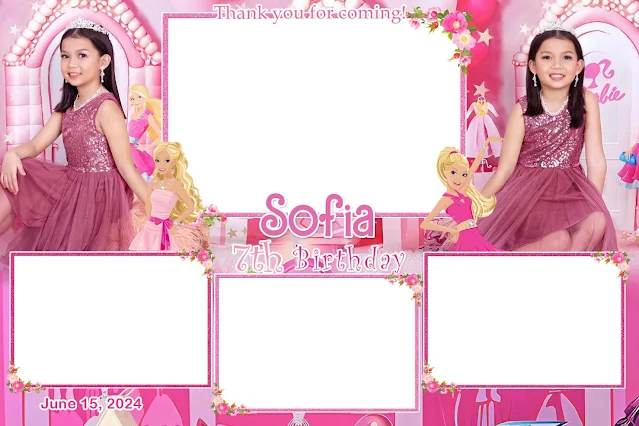
A Barbie-themed photobooth is a fantastic way to capture the joyous and playful moments of a 7th birthday party. Creating a custom photobooth template using Adobe Photoshop can add a personalized touch to your event, ensuring a memorable experience for all attendees. Here is a step-by-step guide to help you design your very own Barbie photobooth template.
Step 1: Setting Up Your Canvas
Open Adobe Photoshop.
Create a New Document: Go to File > New.
Set the Dimensions: Select dimensions suitable for your photobooth photos. A standard size is 4x6 inches for an 4r print at 300 dpi.
Choose a Background: Start with a blank background or select a Barbie-themed one for added color and vibrancy.
Step 2: Designing the Framework
Create a Border:
Use the Rectangular Marquee Tool to create a rectangular selection around the edge of your template.
Go to Edit > Stroke and choose a suitable color, thickness, and position for your border.
Add Rectangles for Photos:
Use the Rectangular Marquee Tool to create areas where the photos will go.
Fill these selections with a color to distinguish them from the rest of your template. Keep them spaced evenly for a balanced look.
Step 3: Incorporating Barbie Elements
Adding Barbie Graphics:
Search for Barbie graphics online (ensure that they are free to use or that you have the appropriate licenses).
Place the graphics by going to File > Place Embedded and selecting your graphic files.
Resize and move the graphics to fit your template layout.
Barbie Text & Fonts:
Use the Text Tool to add any text you want, such as "Sofia's 7th Birthday" or "Thank You for Coming!"
Choose a font that fits the Barbie theme. You can find Barbie-styled fonts online.
Step 4: Personal Touches
Adding Date and Personal Messages:
Use the Text Tool to add the event date and any special messages you want to include.
Place these texts in a location that complements the design and doesn’t clutter the visual aesthetics.
Customizing Colors:
Utilize Barbie’s iconic colors such as pink, purple, and white.
Modify the colors of your elements by using the Paint Bucket Tool or Layer Styles.
Step 5: Final Adjustments
Aligning Elements:
Ensure that all elements are properly aligned using Photoshop’s alignment tools.
Layers and Grouping:
Organize your layers by grouping related elements (like backgrounds, texts, and photo holders) to make adjustments easier.
Review for Consistency:
Check for any inconsistencies or any areas that might need fine-tuning.
Save your Work:
Save your file as a PSD to preserve the layers.
Export the final design using File > Save As and choose the appropriate format (JPG or PNG) for printing.
Step 6: Printing and Setting Up
Print the Template:
Print your photobooth template on high-quality paper.
Setting Up the Photobooth:
Attach the printed template inside a photobooth frame.
Ensure the lighting and camera setting are arranged to capture the best quality photos.
Conclusion
Creating a Barbie photobooth template for a 7th birthday party using Photoshop is a delightful way to add a customized touch to the celebration. Easy to follow and customizable, this guide ensures you can produce a professional and elegant template that matches the festive spirit of the event. The joy on the children’s faces as they pose in front of their favorite Barbie icons will be priceless! Happy designing and enjoy the party!

Comments
Post a Comment